Handbook
Welcome to the awesome world of the Reatom library! 🤗
This powerful tool is designed to become your go-to resource for building anything from tiny libraries to full-blown applications.
We know the drill: usually, you’d have to keep reinventing the wheel with high-level patterns or depend on external libraries. Both are tough to balance perfectly for interface equality, semantic compatibility, performance, ACID principles, debugging, logging, test setup, and mocking.
To make life easier, we’ve crafted the perfect building blocks (atom and action) and a bunch of packages on top of them.
These tools tackle the tough stuff so you can focus on being creative.
This guide will walk you through all the features of Reatom, including the core concepts, mental model, ecosystem, and infrastructure.
TL;DR
#Need a quick start? Here is a list of the key topics:
- @reatom/core: provides basic primitives to build anything. Store your state in an
atomand your logic in anaction. - Immutable Data: just like in React or Redux, all data changes should be immutable.
ctx: this is essential for better debugging, simple testing, and SSR setup.- @reatom/async: will help you to handle network state smoothly.
- Helpful Packages: check out the Packages section in the sidebar for more useful tools.
- @reatom/eslint-plugin: automatically adds debug names to your code, and @reatom/logger prints helpful logs to your console.
- Template repo: will help you to get started quickly
Installation
#The core package is packed with features and has a great architecture. You can use it as is for small apps or build your own framework on top of it for larger projects.
For your convenience, we’ve created a framework package suitable for most apps and developers. Basically, it’s a collection of the most useful packages reexported, simplifying Reatom’s use and maintenance. It shortens imports and direct dependencies, making updates easier.
Tree shaking works just fine, so don’t worry about the bundle size. Reatom development is highly focused on efficiency in this aspect.
This guide will walk you through all the main features, including installing infrastructure packages like testing and eslint-plugin. The logger package is already included in the framework, so no extra installation is needed.
The final piece of the installation script depends on your stack.
Most likely you will need @reatom/npm-react adapter package, but we also have adapters for other view frameworks.
The “npm-” prefix in adapter packages prevents naming collisions with ecosystem packages, as the NPM global namespace is widely used, and many common words are already taken.
npm i @reatom/framework @reatom/testing @reatom/eslint-plugin @reatom/npm-reactA note about the ecosystem: all packages that start with “@reatom/” are built and maintained in the monorepo.
This approach allows us to control compatibility and stability precisely, even with minor releases. If you want to contribute a new package, feel free to follow the contributing guide.
We have a package-generator script that will bootstrap a template for a new package.
All we need from you are the source code, tests, and documentation 😉
Reactivity
#Let’s write some simple form code and make it reactive to boost scalability, debuggability, and testability.
We’re using a separate state manager for this form as an example to show how it works. The benefits will get bigger as your real application grows.
<input id="NAME" /><p id="GREETING"></p>export let name = localStorage.getItem('name') ?? ''const updateName = (newName) => { name = newName localStorage.setItem('input', name) greeting = `Hello, ${name}!`}
export let greeting = ''
// view bindingsNAME.value = nameNAME.oninput = (event) => { updateName(event.target.value) GREETING.innerText = greeting}greeting = `Hello, ${name}!`GREETING.innerText = greetingSo, the code above is pretty straightforward, isn’t it? However, it’s already messy and has some unexpected bugs.
The first obvious issue is code duplication.
We repeat Hello... and assign innerText twice, and this can’t be fixed easily.
Moving it to a separate function might help, but you’ll still need to call that function twice: once for initialization and once for updating.
The second significant issue is code coupling. In the code above, the update logic for the greeting is in the name update handler, but the actual data flow is inverse: the greeting depends on the name. While this might seem trivial in a small example, it can lead to confusion in real applications with complex code organization and business requirements. You might lose track of why one part of the code changes another.
Reactive programming can address these issues by accurately describing dependent computations within each domain.
Let’s refactor the code using Reatom.
We use the atom function to wrap our changeable data:
- If you pass a primitive value to the atom, it allows the state to change.
- If you pass a
computerfunction to the atom, it creates a read-only atom that automatically recomputes when dependent atoms change, but only if the computed atom has a subscription.
export const nameAtom = atom(localStorage.getItem('name') ?? '')nameAtom.onChange((ctx, name) => {  localStorage.setItem('input', name)})
export const greetingAtom = atom((ctx) => {  const name = ctx.spy(nameAtom)  return `Hello, ${name}!`})
// view bindingsNAME.value = ctx.get(nameAtom)NAME.oninput = (event) => {  nameAtom(ctx, event.target.value)}ctx.subscribe(greetingAtom, (greeting) => {  GREETING.innerText = greeting})
Now, we have the same amount of code, but it is much better organized and structured.
Plus, we have ctx!
This context object provides powerful capabilities for debugging, testing, and many other useful features. We’ll explore these advantages in more detail later.
Data consistency
#Data consistency is a critical challenge that can be difficult to manage and debug.
For instance, if your code runs in an environment that heavily uses a storage (localStorage, for example), you might encounter a quota error when setting new data.
In such cases, users will see their input changes, but the greeting updates won’t occur.
Although wrapping storage processing code in a try-catch block can handle this, many developers consider these errors too rare to address in practice.
It would be great to solve these problems elegantly with a consistent pattern.
Reatom provides excellent features for maintaining data consistency. All data processing is accumulated and saved in the internal store only after completion. If an error occurs, like “Cannot read property of undefined,” all changes are discarded. This mechanism is similar to how React handles errors during the rendering process or how Redux handles errors in reducers.
This concept comes from database theory and is part of the ACID principles. That’s why the
atomis named so.
This transaction logic works automatically, ensuring data consistency under the hood.
You only need to keep the data immutable.
For instance, to update an array state, create a new one using the spread operator, map, filter, etc.
Reatom also offers the ctx.schedule API, which separates pure computation from effects.
The benefit is that you can call ctx.schedule anywhere, as the context propagates through all primitives and callbacks of Reatom units.
This scheduler pushes the callback to a separate queue, which is executed only after all pure computations, making your data flow safer and more manageable.
Let’s apply a minor refactoring to illustrate these improvements.
export const nameAtom = atom(localStorage.getItem('name') ?? '')nameAtom.onChange((ctx, name) => { ctx.schedule(() => { localStorage.setItem('input', name) })})That’s it! Now, your pure computations and effects are separated. An error in the local storage logic won’t affect the results of the atoms’ computations.
Another cool feature of the schedule API is that it returns a promise with the data from the callback.
This makes it easy to handle various data-related side effects, such as backend requests, step-by-step.
In the next section, we will introduce action as a logic container and explore async effects.
Actions
#Let’s enhance our form to create something more valuable, like a login form
<form id="FORM"> <input id="NAME" /> <p id="GREETING"></p> <input type="submit" /></form>export const nameAtom = atom(localStorage.getItem('name') ?? '')nameAtom.onChange((ctx, name) => { ctx.schedule(() => { localStorage.setItem('input', name) })})
export const greetingAtom = atom((ctx) => { const name = ctx.spy(nameAtom) return `Hello, ${name}!`})
export const submit = action(async (ctx, event) => { event.preventDefault() const name = ctx.get(nameAtom) const body = new FormData() body.append('name', name)
const response = await ctx.schedule(() => fetch('/api/submit', { method: 'POST', body: body }), ) if (!response.ok) { alert(`Oups, the API is doesn't exist, this is just a test.`) }})
// view bindingsNAME.value = ctx.get(nameAtom)NAME.oninput = (event) => { nameAtom(ctx, event.target.value)}ctx.subscribe(greetingAtom, (greeting) => { GREETING.innerText = greeting})FORM.onsubmit = (event) => { submit(ctx, event)}That’s it for now. The remaining part of the tutorial is a work in progress 😅
…
Debugging
#The immutable nature of Reatom provides incredible possibilities for debugging various types of data flow, both synchronous and asynchronous. Atoms’ internal data structures are specially designed for easy investigation and analysis.
One of the simplest ways to debug data states and their causes is by logging the ctx object.
The ctx object includes the cause property, which holds internal representation and all meta information.
Check out this example to see it in action.
export const pageAtom = atom(1, 'pageAtom').pipe(  withReducers({    next: (state) => state + 1,    prev: (state) => Math.max(1, state - 1),  }),)
export const issuesReaction = reatomResource(async (ctx) => {  const page = ctx.spy(pageAtom)  return await ctx.schedule(() =>    request<IssuesResponse>(      `https://api.github.com/search/issues?q=reatom&page=${page}&per_page=10`,      ctx.controller,    ),  )}, 'issuesReaction').pipe(withDataAtom({ items: [] }))
export const issuesTitlesAtom = atom((ctx) => {  console.log('issuesTitlesAtom ctx', ctx)  return ctx.spy(issuesReaction.dataAtom).items.map(({ title }) => title)}, 'issuesTitlesAtom')
Here is an example of what you will see from logging the issuesTitlesAtom ctx
Some data is omitted for brevity, check the sandbox for the full log
{ "proto": { "name": "issuesTitlesAtom" }, "state": [...], "cause": { "proto": { "name": "issuesReaction.dataAtom" }, "state": { "total_count": 202, "incomplete_results": false, "items": [] }, "cause": { "proto": { "name": "issuesReaction.onFulfill" }, "state": [], "cause": { "proto": { "name": "issuesReaction" }, "state": [], "cause": { "proto": { "name": "pageAtom" }, "state": 1, "cause": { "proto": { "name": "pageAtom._next" }, "state": [] } } } } }}As you can see, the cause property includes all state change causes, even asynchronous ones.
But what about the empty arrays in action states?
These are lists of action calls (with payload and params) that only exist during a transaction and are automatically cleared to prevent memory leaks.
To view persisted actions data and explore many more features, try reatom/logger.
Additionally, you can inspect all atom and action patches by using:
ctx.subscribe(logs => console.log(logs));Lifecycle
#Reatom is heavily inspired by the actor model, which emphasizes that each component of the system is isolated from the others. This isolation is achieved because each component has its own state and lifecycle.
This concept is applied to atoms in Reatom. We have an API allows you to create a system of components that are independent of each other and can be used in different modules with minimal setup. This is one of Reatom’s main advantages over other state management libraries.
For example, you can create a data resource that depends on a backend service and will connect to the service only when the data atom is used. This is a very common scenario for frontend applications. In Reatom, you can achieve this using lifecycle hooks.
import { atom, action } from '@reatom/core'import { onConnect } from '@reatom/hooks'
export const listAtom = atom([], 'listAtom')export const fetchList = action(  (ctx) =>    ctx.schedule(async () => {      const list = await api.getList()      listAtom(ctx, list)    }),  'fetchList',)onConnect(listAtom, (ctx) => fetchList(ctx))
What happens here?
We want to fetch the list only when a user navigates to the relevant page and the UI subscribes to listAtom.
This works similarly to useEffect(fetchList, []) in React.
Since atoms represent shared state, the connection status is “one for many” listeners, meaning an onConnect hook triggers only for the first subscriber and not for new listeners.
This is extremely useful because you can use listAtom in multiple components to reduce props drilling, but the side effect is requested only once.
If the user leaves the page and all subscriptions are gone, the atom is marked as unconnected, and the onConnect hook will be called again only when a new subscription occurs.
An important aspect of atoms is that they are lazy.
This means they will only connect when they are used.
This connection is triggered by ctx.subscribe, but the magic of Reatom’s internal graph is that ctx.spy also establishes connections.
So, if you have a main data atom, compute other atoms from it, and use these computed atoms in some components, the main atom will only connect when one of those components is mounted.
const filteredListAtom = atom((ctx) => { const list = ctx.spy(fetchList) return list.filter(somePredicate)})ctx.subscribe(filteredListAtom, sideEffect)The code above will trigger the listAtom connection and the fetchList call as expected.
Note that the relationships between computed atoms are unidirectional. This means
filteredListAtomdepends onlistAtom. Therefore,listAtomis unaware offilteredListAtom. If you useonConnect(filteredListAtom, cb)and onlylistAtomhas a subscription, the callback will not be invoked.
When you use an adapter package like npm-react, it utilizes ctx.subscribe under the hood to listen to the atom’s fresh state.
So, if you connect an atom with useAtom, the atom will be connected when the component mounts.
const [filteredList] = useAtom(filteredListAtom)Now, you have lazy computations and lazy effects!
This pattern allows you to control data requirements in the view layer or any other consumer module implicitly, while being explicit for data models. There’s no need for additional start actions or similar mechanisms. This approach leads to cleaner and more scalable code, enhancing the reusability of components.
You can find many great examples in the async package docs.
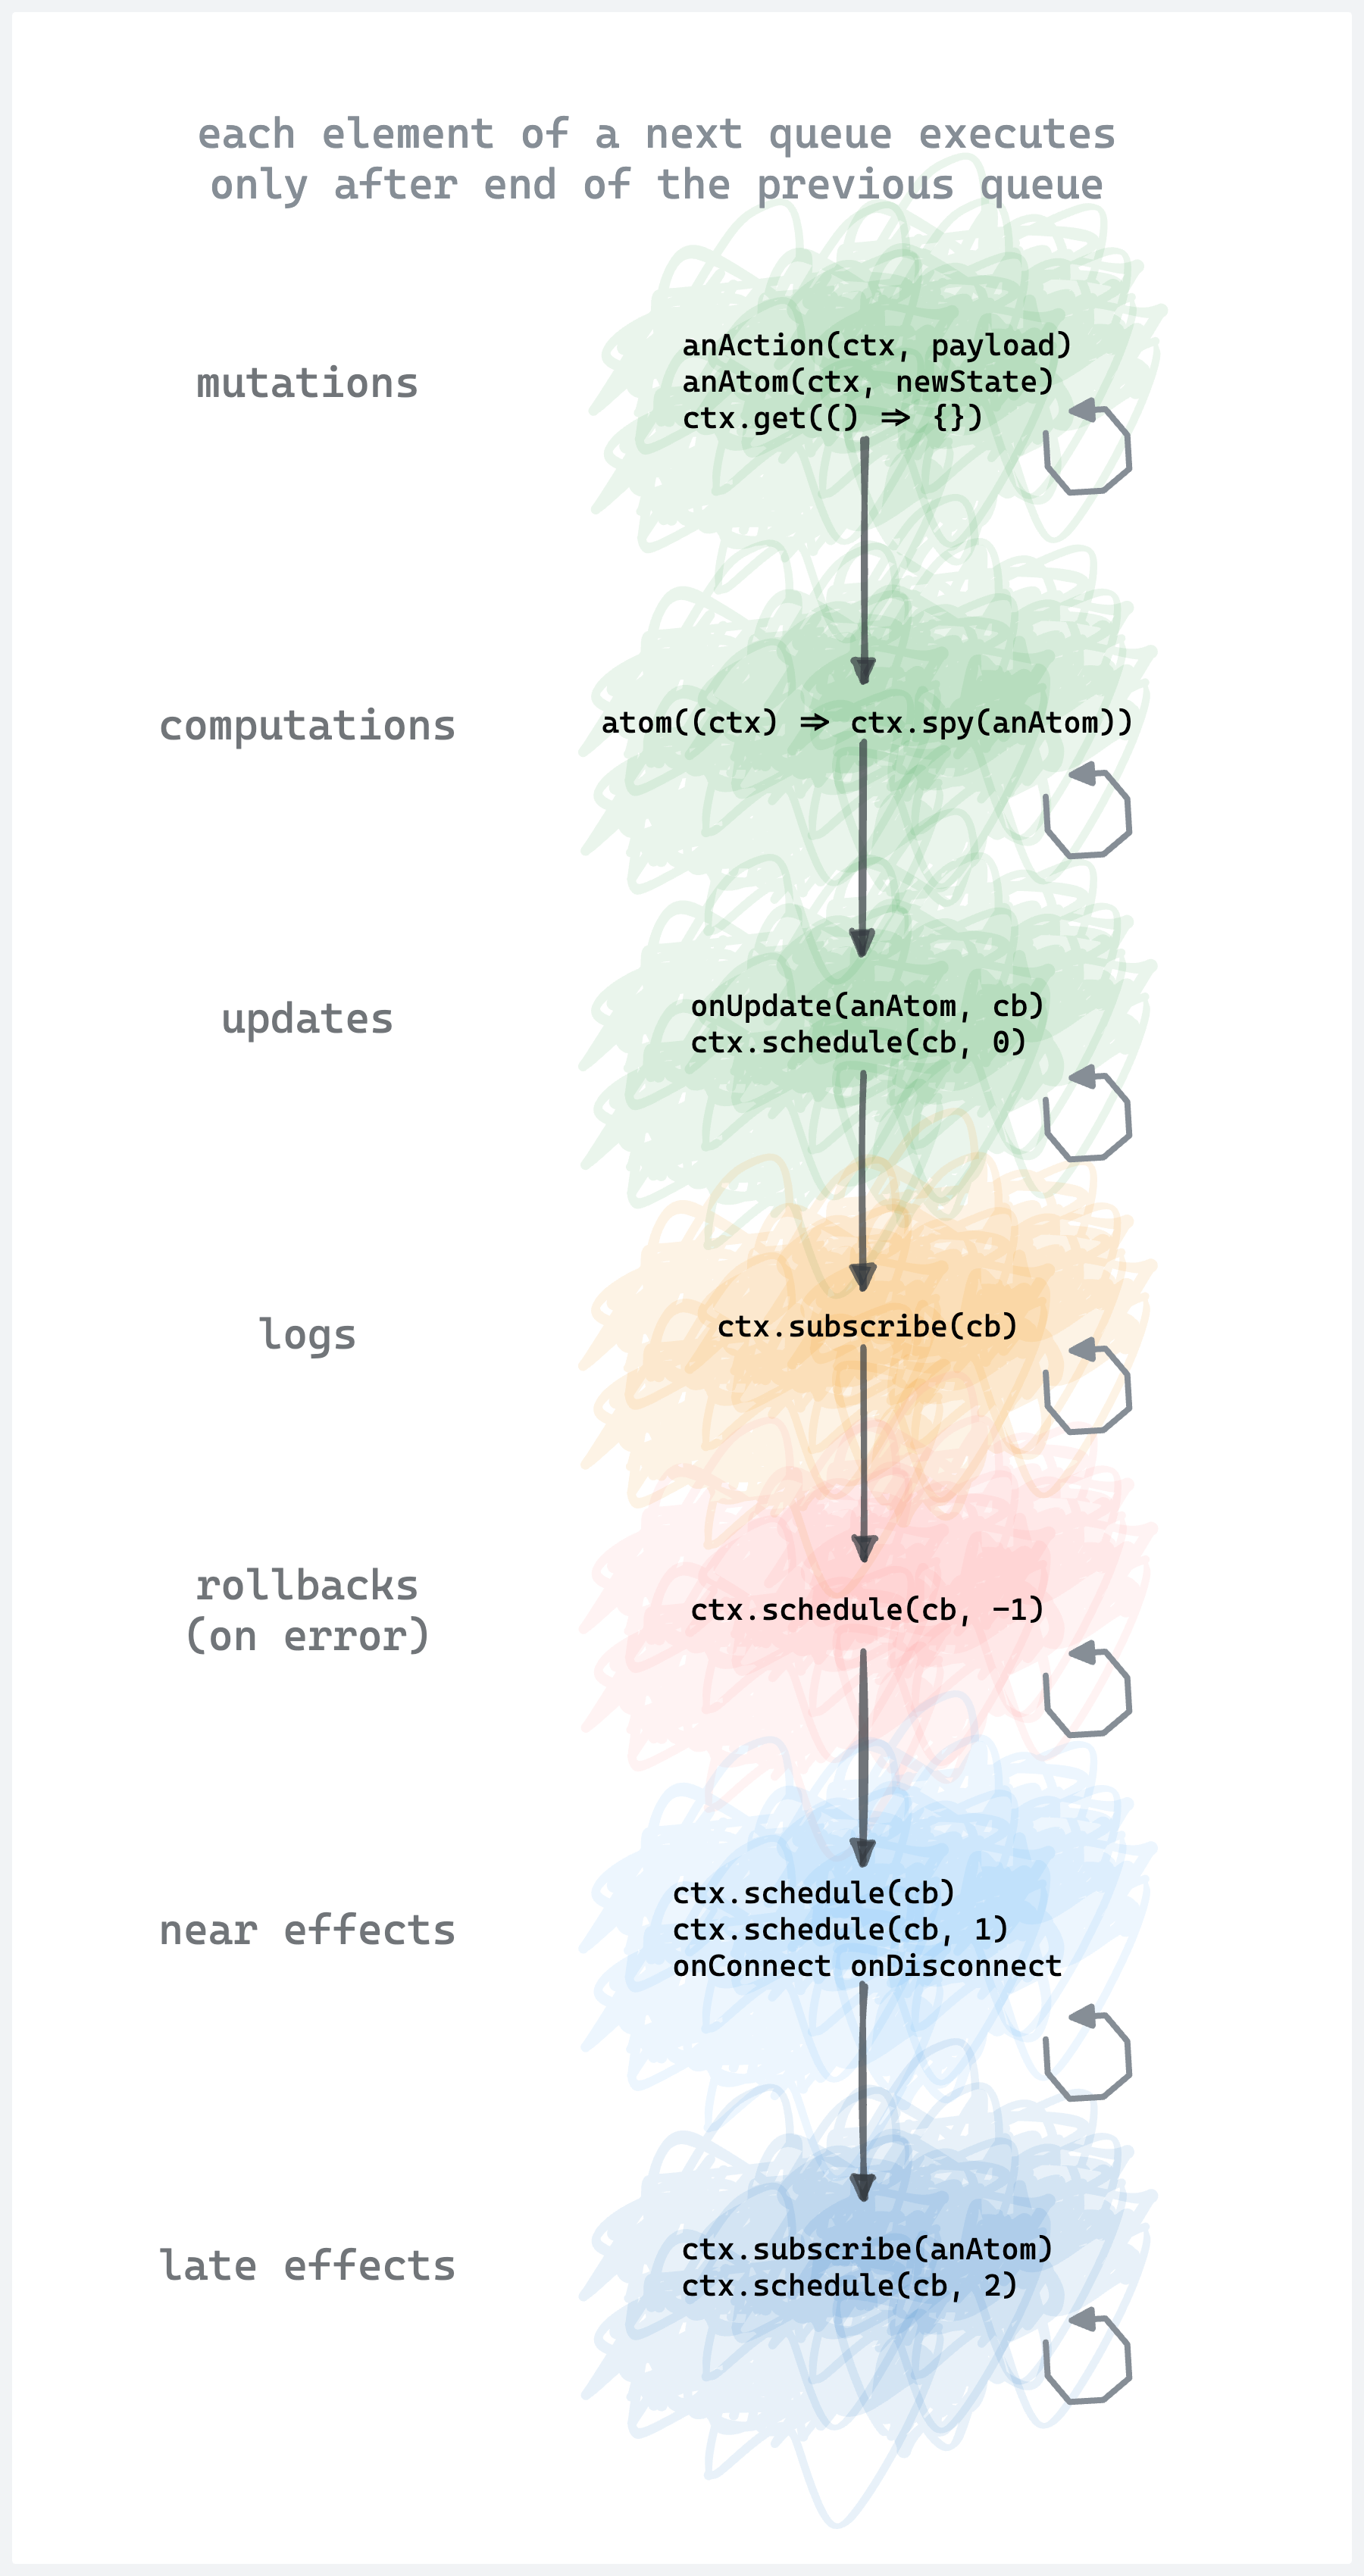
Lifecycle scheme
#Here is a scheme illustrating the execution order of the built-in queues.
For more details on how to use the queues, refer to the ctx.schedule documentation.